Tuesday, October 13, 2009

How to Convert WMV to QuickTime on Mac (including Snow Leopard)

WMV is a popular video format while it's not compatible with Mac system. If you just need to play it in QuickTime, you can download Flip4Mac for free and it enables you to play WMV videos. But if you want to convert it to QuickTime or to upload it to iTunes for playback on your iPod, iPhone or other portable players, you need this professional yet easy-to-use WMV Video Converter for Mac.

Below is the step by step tutorial about how to convert WMV for QuickTime on Mac.

Step 1, Click the "Add files" button to load your WMV videos on your Mac.


Step 2, Choose “MOV” as the output format


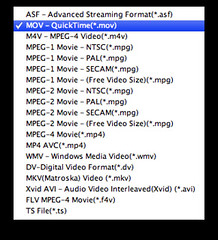
This Mac WMV video converter can convert WMV video to all popular video formats for iPod, iPhone, PSP, PS3, Apple TV, Zune, Creative Zen, MP4 players and MP3 players and so on. If you don't know what formats your device supports, you can just select the format according to your device's name.

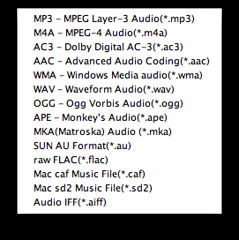
If you want to extract audio from WMV files on Mac, you can select the output format as MP3, AAC, M4A, AC3, WMA, WAV, OGG, APE, MKA, AU, FLAC, CAF, SD2, AIFF.


Step 3, Start the WMV to QT Conversion

When you finish the output setting, just click the “Convert” button to start conversion.

more tags:
Convert WMV to QuickTime on MacWMV to QT converter for MacWMV to QT snow leopardwmv for Quicktime Snowleopardwmv "snow leopard"play wmv mac snow leopardwmv to quicktime on macmac convert wmv to quicktimewmv to quicktime snow leopard

How to Transfer Songs and Videos from iPod/iPhone to Mac for Free

iPod touch as example


When you accidently delete music or videos in your iTunes Library, or you lost all songs and movies files when your hard drive on your Mac die, you might try to recover the data from your iPod by connecting it to iTunes, only to find that’s no way to get the files back to your Mac. Or you just got a new Mac and you want to transfer you iPod touch content to it. In cases like these, FreeSync is a totally free program that can help you transfer your songs and videos to Mac. And below is the step by step tutorial about how to transfer songs and movies from iPod touch to Mac.


Note: The upcoming version of FreeSync will support iPhone 3GS, iPhone updated to OS 3.1, iPod touch updated to OS 3.1, and new iPods released on Apple “Rock and Roll” media event.


Step 1: Launch iSkysoft FreeSync and then connect iPod touch to Mac.


Step 2: Click “Music” or “Movies” playlist and then tick the file you want to export.


Step 3: Click “iPod To Mac” to start transferring your music or movies file to your Mac


Step 4: Select a destination folder to save your iPod touch music and videos and click “OK”


Note: If you want to import music or movies to iTunes, you can either drag the output folder of you iPod touch content to the “Library” icon and let iTunes to classify your music and movies, or go to “File” pane and select “Add to Library” to navigate to output iPod touch content and add it to iTunes.


FreeSync is a good helper for you to transfer iPod songs and movies to your Mac. If you have both iPod and iPhone, this smart program also allows you to transfer all contents to Mac at a time by connecting your iPod and iPhone with Mac simultaneously.